
Adding trim to any room can instantly elevate the look and feel of the space. It adds a touch of elegance and can hide imperfections around the edges of walls, floors, or ceilings.
However, the traditional method of attaching trim using nails or a nail gun can be intimidating and may not be an option for those not experienced with power tools. Fortunately, alternative methods for attaching trim do not require nails or a nail gun.
Here, we will discuss some techniques for attaching trim without nails or a nail gun, allowing you to achieve a professional-looking finish without needing specialized equipment. So, put away those tools and explore some ingenious ways to add trim to your space without the hassle of nails.

11 Steps To Attach Trim Without Nails Or A Nail Gun – A Definitive Guide

Attaching trim is an essential step when finishing and enhancing the look of a project. Trim, often made of wood or PVC, covers the gaps and joints between different materials, providing a clean and polished appearance. Attaching trim requires careful planning and precise execution to ensure a seamless integration with the overall design. Below, we will discuss 11 Steps to Attach Trim without Nails or a Nail Gun:
Tools and Materials Needed:
- Molding/ Baseboard / Trim
- Measurement Tape
- Marker (optional)
- Knives or saw
- Sandpaper
- Paint, paintbrush, or roller
- Primary Glue or Construction Adhesives
- Silicone caulk
- Secondary Glue/ Quick setting glue spray
- Cardboard (optional)
- Rod or stick (optional)
- Damp sponge/ Cloth
The time needed: 15 to 20 minutes per trim/baseboard. Please note that it takes approximately a few minutes to attach one single trim. The total time to finish the entire procedure depends on the size of your room. If you have a large room, installing the trims might take hours.
Step 1: Clean The Baseboard Trim

It is important to clean the baseboard trim before attaching trim without nails or a nail gun. This will ensure that the adhesive sticks properly and that no dirt or debris particles can interfere with the attachment. Start by wiping the trim down with a damp cloth to remove dust or grime.
Then, use a mild detergent or cleaning solution to clean the trim’s surface thoroughly. Rinse off any residue with clean water and allow the trim to dry completely before proceeding with the attachment process. By starting with a clean surface, you can ensure a secure and long-lasting bond between the trim and your desired surface.
Step 2: Get the Measurement
It’s important to get accurate measurements of the area where you want to install the trim. Measure the length and width of the wall or surface where the trim will be placed. Use a tape measure to ensure precise measurements. Once you have the measurements, you can determine how much trim you need and plan accordingly. This step is crucial for ensuring your trim installation is seamless and professional-looking.
Step 3: Cut the Baseboard

One way to attach trim without nails or a nail gun is by cutting the baseboard to fit the desired length and angle. This can be done using a mitre or a coping saw, depending on the complexity of the cut. Once the baseboard is cut, it can be attached to the wall using construction adhesive.
Apply a generous amount of adhesive to the back of the baseboard and press it firmly against the wall. Use clamps or tape to hold it in place until the adhesive dries completely. This method provides a secure attachment without needing nails or a nail gun.
Step 4: Prepare The Edges – Smooth and Level
Before attaching trim without nails or a nail gun, it is important to prepare the edges of the surface. This involves ensuring that they are smooth and level, as any imperfections can affect the appearance and durability of the trim. Start by sanding down any rough spots or high points using sandpaper or a sander.
Next, use a level to check for any unevenness along the edges and make any necessary adjustments. By preparing the edges properly, you can ensure that the trim will adhere securely and create a clean, professional finish.
Step 5: Test Fit The Trim

Before attaching trim without nails or a nail gun, it is important to test the fit of the trim. This involves holding the trim in place and ensuring it fits properly and aligns with the surrounding surfaces. By doing this, you can make any necessary adjustments before permanently attaching the trim.
This step is crucial in ensuring a clean and professional-looking finish once the trim is attached using alternative methods such as adhesive or screws. So, take the time to test fit your trim before moving forward with the installation process.
Step 6: Paint or Varnish the Trim Beforehand
Attaching trim without nails or a nail gun is to paint or varnish the trim beforehand. This ensures the trim is fully finished and protected before attaching it to your desired surface. This can help to prevent any damage or discolouration that may occur during the attachment process. Additionally, painting or varnishing the trim beforehand allows you to easily touch up any areas that may have been missed during installation.
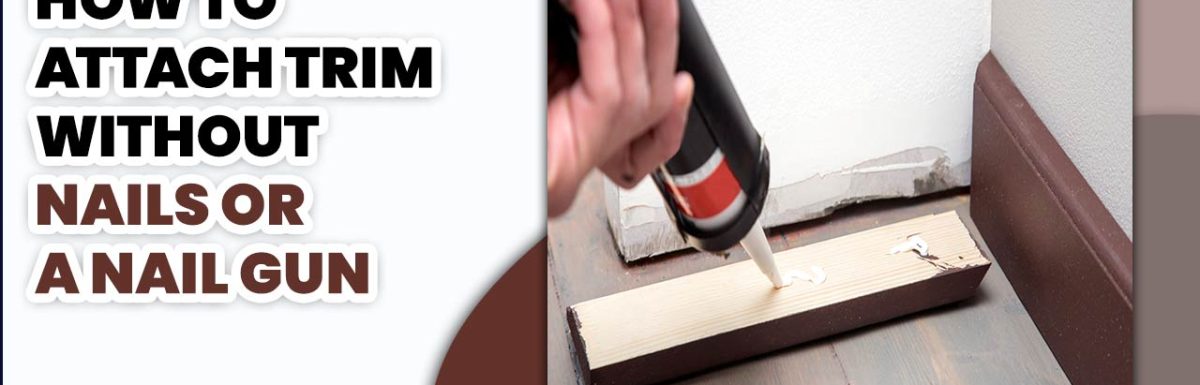
Step 7: Spray! Spray!
Applying secondary glue isn’t at all necessary. But when you want a fast and almost instant attachment, consider using setting glue. Spray the glue in the upper flat portion of your trim and where you want to attach your frame. The spray might cause the glue to splash all over the place, making it difficult for you to remove it. So, using cardboard, a cork sheet or anything rigid to protect the region while spraying is better. Cover the areas where you don’t want the glue to be spread.
Step 8: Glue It Together

One option is to use glue without nails or a nail gun when attaching trim. Different types of adhesive can be used for this purpose, such as construction adhesive or wood glue. To attach the trim using glue, first apply a thin and even layer of adhesive onto the backside of the trim. Then, press the trim firmly against the surface where you want it to be attached. Before applying the glue, it is important to ensure the surfaces are clean and free from dust or debris.
Step 9: Trim Installation
You can use a few alternative methods when attaching trim without nails or a nail gun. One option is construction adhesive, which allows the trim to be glued directly onto the surface. Another method is using finishing nails or screws in inconspicuous areas, such as the top or bottom of the trim piece.
You can also use a pneumatic brad nailer, which uses compressed air to drive small nails into the trim. These methods provide secure attachment without needing traditional nails or a nail gun.
Step 10: Seal the Gaps

If you notice any gap between the trim and the wall, do not panic. Use caulks to seal the gaps. Apply the caulk in a continuous streak along with the gaps of the trim and wall. Wet your hand and then smoothen the surface. After it completely dries, use sandpaper again to ensure a smooth finish. But be careful not to overdo it, as excessive sanding can damage the wood underneath. If needed, you can always re-prime the area.
Step 11: Clear any Excess Adhesive or Glue
When attaching trim without nails or a nail gun, it is important to clear any excess adhesive or glue that may have squeezed out during the attachment process. Excess adhesive can be unsightly and may interfere with the proper installation of the trim.
To remove excess adhesive, use a putty knife or scraper to scrape away any visible residue carefully. Work slowly and gently to avoid damaging the trim or surrounding surfaces. Once the excess adhesive has been removed, wipe down the area with a clean cloth dampened with water or a mild household cleaner to ensure a clean and professional finish.
Replacing An Old Trim With The New One

Replacing old trim with new trim can be daunting, especially if you don’t have access to nails or a nail gun. However, a popular technique can help you attach trim without these tools. One option is to use construction adhesive to secure the trim in place.
Apply a thin bead of adhesive along the back of the trim, then press it firmly against the desired surface, such as the ceiling or wall. Hold it in place for a few minutes to allow the adhesive to bond. This method requires some skill and precision, but with practice, you can achieve professional-looking results without needing nails or a nail gun.
What Is The Downside Of Using Adhesives?
Adhesives have become integral components of various industries, offering a convenient and reliable way to bond different materials. However, it is important to consider the potential downsides and limitations of using adhesives in certain applications. Here are some key points to keep in mind:
- Potential damage to surfaces when removing adhesives
- Some adhesives might release harmful fumes
- Adhesives may not be suitable for certain materials
- Adhesives can be messy and difficult to clean up
- Adhesives may not provide a strong enough bond for certain applications
Which One Is More Preferred? Adhesives or Nail and Nail Gun?

Adhesives and nails have pros and cons when attaching trim without nails or a nail gun. Also, adhesives offer a convenient and easy-to-use option, as they eliminate the need for tools and can provide a strong bond. However, they may not be as durable as nails and can be more difficult to remove if necessary.
On the other hand, nails and a nail gun offer a more secure attachment but require additional tools and can leave visible holes in the trim. Ultimately, the choice between adhesives and nails will depend on factors such as the type of trim, desired durability, and personal preference.
Are There Any Alternatives To Construction-Grade Adhesives?

Yes, a very good alternative to construction-grade adhesive is a liquid nail. These provide latex-based adhesion for an extended period. Try to get a heavy-duty liquid nail to get a similar result as the nails or nail guns. That will do the work like magic.
However, it usually takes about seven days for the liquid nails to reach their maximum strength and provide a firm connection between the trim and the surface. So you can wait a few more days and observe if there is any problem. If you have doubts, it is better to call a carpenter.
Any Safety Measures To Follow?
If you want to attach trim without nails or a nail gun, alternative methods can provide your project with a secure and seamless finish. Not only do these methods eliminate the need for nails or a nail gun, but they also offer a safer and more convenient solution. Here are some key safety measures to keep in mind:
- Wear safety gear (goggles, gloves)
- Use trim-specific adhesive for a strong bond
- Follow the manufacturer’s instructions
- Clean the surface before attaching the trim
- Apply even pressure for proper adhesion
Conclusion
Attaching trim without nails or a nail gun may seem daunting, but it can be easily accomplished with the right tools and techniques. By using the correct size of trim nails, measuring with a tape measure to ensure exact sizes, and applying wood glue for added strength, you can securely attach the trim to any surface without the need for nails or a nail gun.
This method provides a clean and seamless finish and eliminates the risk of damaging your walls or surfaces. So whether you’re a seasoned DIY enthusiast or starting, don’t let the lack of a nail gun hold you back from achieving professional-looking results. Try these alternative methods and enjoy the satisfaction of completing your trim project with ease.
Leave a Reply