
When constructing a roof, one of the most important steps is attaching rafters to the ledger or ridge board. This connection is crucial for the stability and strength of the roof, as it supports the weight of the entire roofing system.
However, improper installation of rafters can lead to serious structural issues and even safety hazards. Therefore, it is essential to understand the correct techniques for attaching rafters to the ledger or ridge board.
We will guide you through a step-by-step process on correctly attaching rafters to the ledger or ridge board. We will discuss the necessary tools and materials needed. With a professional tone, we will break down the process into manageable steps, making it easier for beginners to follow.

What Is A Ledger Or Ridge Board?

A ledger or ridge board is a structural element used in roof framing. It is typically a horizontal beam that runs along the length of the roof’s ridge or top edge. The purpose of the ledger or ridge board is to provide support and stability to the roof trusses or rafters, helping to distribute the weight of the roof evenly and resist any horizontal forces.
What Is A Rafter?
A rafter is a perfect solution to add extra support to your roof or ceiling. A structural member attaches to the ledger or ridge board and helps align the building. There are various types of rafters, each with specific installation instructions. If you’re a beginner, don’t worry – you can install a rafter easily.
If you follow the instructions correctly, your rafters will last a long time and support your building needs. It’s essential to attach rafters correctly so they don’t sag or pull away from the walls during strong winds or heavy rains.
5 Steps To Attach Rafters To The Ledger Or Ridge Board

Attaching rafters to the ledger or ridge board is important in constructing a sturdy and secure roof. Here are 5 steps to guide you through the process. Following these steps, you can ensure that your rafters are properly attached to provide a strong foundation for your roof structure. Consult with a professional if you are unsure about this process.
Step 1: Measuring And Marking For Rafter Placement

Measuring and marking for rafter placement is a crucial step in attaching rafters to the ledger or ridge board. To ensure proper alignment and spacing, start by determining the desired length of the rafters. Measure from the wall gusset plate to the top of the ridge board and mark this measurement on each rafter. Next, determine the spacing between each rafter. This can be done by dividing the total run of the roof by the desired spacing.
Mark these measurements on the ledger or ridge board. Finally, use a level to draw a straight line connecting each mark, indicating your positioning of each rafter. Taking accurate measurements and marking carefully will help ensure your rafters are properly aligned and securely attached.
Step 2: Preparing The Ledger Or Ridge Board For Rafter Attachment
Preparing the ledger or ridge board is a crucial step when attaching rafters. Before you begin, make sure you properly size and securely fasten the ledger or ridge board to the supporting structure. This will provide a stable base for attaching the rafters.
Additionally, it is important to ensure that the ledger or ridge board is level and straight, as any inconsistencies can affect the overall stability of the roof. Take the time to carefully measure and align the ledger or ridge board before proceeding with the rafter attachment. Properly preparing the ledger or ridge board ensures your roof structure is strong and secure.
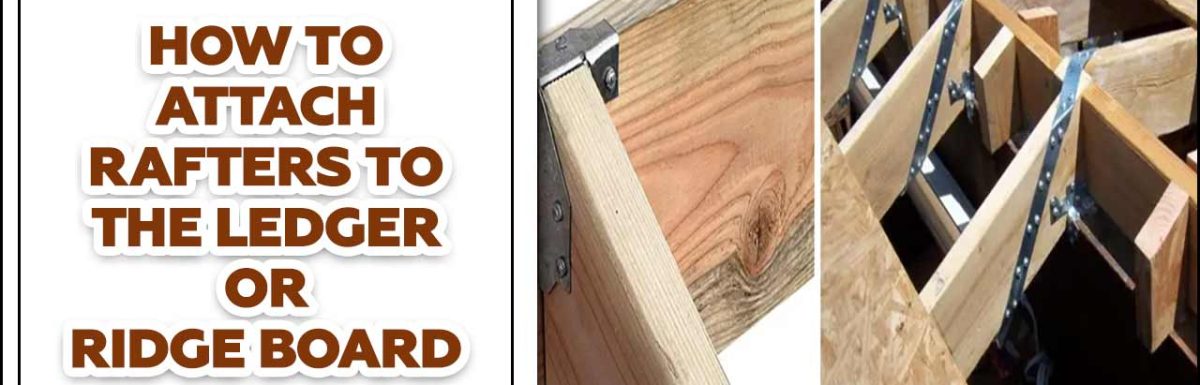
Step 3: Installing Rafter Hangers Or Brackets

One step in attaching rafters to the ledger or ridge board is installing rafter hangers or brackets. Rafter hangers or brackets are metal devices that support and stabilize the rafters. You typically attach them to the ledger or ridge board using screws or nails.
When installing rafter hangers, position them correctly and securely fasten them to prevent potential structural issues. It is also important to follow the manufacturer’s instructions and guidelines when installing rafter hangers to ensure proper installation and maximum support for the rafters. Properly installing rafter hangers or brackets ensures the structural integrity of your roof system and creates a solid foundation for your roofing project.
Step 4: Attaching Rafters To The Ledger Or Ridge Board
Attaching rafters to the ledger or ridge board is important in constructing a roof. This process ensures that the rafters are securely connected and properly aligned, providing stability and support to the overall structure. Start by positioning the rafters on either side of the ledger or ridge board to attach them, ensuring they are evenly spaced.
Then, use nails or screws to secure the rafters to the board, ensuring a tight fit. Proper building department codes and guidelines are important when attaching rafters to ensure a structurally sound roof. Consulting with a professional or experienced builder can provide valuable guidance.
Step 5: Securing And Reinforcing The Rafter Attachment
Following a few key steps is important to ensure a secure and reinforced attachment when attaching rafters to the ledger or ridge board. First, align the rafter properly against the ledger or ridge board. Next, use galvanized nails or screws to secure the rafter in place, spacing them evenly along the length of the rafter. Use at least two fasteners per rafter for added stability.
To reinforce the attachment, consider adding metal straps or brackets on each side of the rafter where it meets the ledger or ridge board. You can secure these with additional nails or screws to provide extra strength and prevent any potential movement or shifting over time. By following these steps and reinforcing the attachment, you can ensure that your rafters are securely and sturdily attached to the ledger or ridge board for long-lasting stability and structural integrity.
What Are The Different Types Of Rafters?

Rafters are the perfect solution if you want extra support for your roof or wall. There are four main types of rafters – gable, hip, valley, and flying. Buyers should carefully consider the advantages and disadvantages of each rafter before purchasing.
Gable rafters attach at the top of a ridge board, while hip rafters attach below it. Lag bolts, valleys and flying rafters create peaked roofs or skylights in a building’s interior. Consult a professional if you’re unsure which type of rafter to choose for your project.
How To Choose Rafters For The Ledger Or Ridge Board
You should select the ledger or ridge board rafters based on weight, size, and type. The rafters should also be strong enough to support the roofing material. When selecting rafters, you should take into account their weight. The heavier the rafters, the greater their strength will be.
Size is also a factor to consider when selecting rafters. Smaller rafters require less support than larger ones to be lighter and more easily moved around. Larger rafters may better suit roofs with thicker materials or those taller than nearby structures.
When choosing rafters for a ledger or ridge board, you must also consider the type of roofing material. Certain types of roofing require certain types of rafters. For example, metal roofing will require heavier rafters than roofs made from other materials.
Importance Of Proper Rafter Attachment
Proper rafter attachment is crucial regarding the structural integrity of a building. The ledger board and ridge board are two key components in the roof framing system, and attaching the rafters securely to these boards ensures that the roof can withstand the weight of snow, wind, and other external forces.
When you do not properly attach rafters, it can lead to sagging or even collapse the roof. Also, proper rafter attachment helps distribute the weight evenly across the entire structure, reducing the risk of localized stress points. Therefore, ensuring that rafters are securely attached to the ledger or ridge board is essential for a safe and sturdy roof.
How Do Rafter Hangers Work?

Attaching rafters to the ledger or ridge board is vital in roofing. Not only will it provide the structure and support your roof needs, but it will also add beauty and function:
- To attach the rafter’s hangers, line up the holes in the ledger or ridge board with the rafter hangers.
- Use a level to ensure the rafters hang evenly and look neat from all angles.
- Use the rafter hangers to attach the rafters to the holes; you’re ready.
The Advantage Of Attach Rafters To Ridge Or Ledger Board
If you’re looking for extra support for your roof system, attaching rafters to the ledger or ridge board is the way to go. This method is more than twice as effective at preventing leaks and damage from storms as traditional methods, and it creates a roomier attic that can be used for storage or additional living space.
Once attached, the rafters are easily accessible for repairs or replacements without removing the entire roof system. So, if you’re looking for a sound and sustainable roof system, attach rafters to the ledger or ridge board today.
Common Mistakes To Avoid
When attaching rafters to the ledger or ridge board, it is important to avoid common mistakes that can compromise the structural integrity of your roof. Here are some key mistakes to avoid: By avoiding these common mistakes, you can ensure a strong and durable material roof that will withstand the test of time.
- Not Using Proper Fasteners: Using the appropriate fasteners, such as nails or screws, designed for securing rafters to the ledger or ridge board is crucial. Using the wrong type of fastener or insufficient fasteners can result in a weak connection.
- Overlooking Spacing And Alignment: You should evenly space and align the rafters properly to ensure a level and stable roof. Maintaining consistent spacing or alignment can cause uneven weight distribution and potential sagging or structural issues.
- Neglecting To Secure Connections: Each rafter should be securely attached to the ledger and ridge board. Failing to secure these connections properly can lead to movement and instability over time.
- Ignoring Local Building Codes: It is essential to adhere to local building codes and regulations when attaching rafters. These codes typically specify requirements for rafter size, spacing, and attachment common methods, which are crucial for ensuring a safe and compliant roof structure.
Tips And Tricks For A Successful Rafter Attachment

Attaching rafters to the ledger or ridge board is important in constructing a roof. Here are some tips and tricks to ensure a successful rafter attachment: By following these tips and tricks, you can ensure a successful rafter attachment that will contribute to your roof structure’s durability and lateral stability.
- Use The Right Materials: Ensure you have all the necessary tools and materials before starting the attachment process. This includes appropriate screws, brackets, and connectors.
- Measure Twice, Cut Once: Accurate measurements are key to a proper rafter attachment. Double-check your measurements before making any cuts to avoid costly mistakes.
- Follow Building Codes And Regulations: Before attaching rafters, familiarize yourself with local building codes and regulations to ensure compliance. This will help ensure the structural integrity and safety of your roof.
- Use Temporary Supports: While attaching rafters, it can be helpful to use temporary supports such as braces or ladders to hold them in place until they are securely attached.
- Securely Fasten Rafters: Use strong screws or nails to fasten the rafters to the ledger or ridge board. Be sure to follow the manufacturer’s instructions for proper installation.
- Consider Professional Help: If you are unsure how to attach rafters properly, it may be best to consult a professional contractor or carpenter with roof rafter construction experience.
Conclusion
Attaching rafters to the ledger or ridge board is crucial in building a strong and stable roof structure. By following the proper techniques and using the right tools, you can ensure that your rafters are securely attached, minimizing the risk of any structural issues down the line.
Remember to carefully measure and mark the placement of each rafter, ensuring they are properly aligned and evenly spaced. Taking the time to attach your rafters properly will result in a well-built roof that will withstand the test of time. As always, consult a professional if you are unsure or inexperienced. With proper installation, your roof will provide long-lasting protection for your home or building.
Frequently Asked Questions:
What Is The Nailing Pattern For Rafters To Ridge?
The nailing pattern for rafters to ridge typically involves driving nails at a 45-degree angle through the rafter into the ridge board. The nails are usually spaced every 6 to 12 inches along the length of the rafter, ensuring a secure and stable connection between the two components.
Do Rafters Need Ridge Board?
No, rafters do not necessarily need a ridge board. A ridge board is typically handy in roof framing to support and stabilize the rafters. However, it is possible to use other methods of support and bracing, such as collar ties or rafter ties, to achieve the same result.
What Board Is Handy For Rafters?
They commonly call the board used for rafters a rafter board or rafter stock. It typically comes with lumber, such as spruce, pine, or fir, and is cut to the appropriate length and angle to support the roof structure.
Can You Build Rafters Without A Ridge Beam?
No, it is not advisable to build rafters without a ridge beam. The ridge beam is vital in providing structural support and stability to the roof. It helps distribute the roof’s weight evenly and prevents the rafters from sagging or collapsing.
Do Rafters Need Purlins?
Yes, rafters typically need purlins. Purlins are horizontal beams installed on rafters to provide extra support and stability to the roof structure. They help distribute the roof’s weight evenly across the rafters, preventing sagging and potential structural issues.
Leave a Reply